Showing posts with label april. Show all posts

Wednesday, April 24, 2013

A Week of Weather: Day 2 - Clouds


In case you're just catching up, this week is all about weather!  My last post was all about wind and now we've moved on to clouds!  Some of these activities were done on different days in my preschool classes, but for the sake of organization, I've grouped them by weather type instead of when they actually occurred.

To get things started, we read It Looked Like Spilt Milk by Charles G. Shaw.  The kids absolutely loved this book - especially because the words are easy enough to memorize quickly and they can read the book to themselves.  The book also sparks conversations about things the kiddos have seen in the clouds; like the mermaid cloud I heard about today!

First up: Blot Art Clouds.  Yes, I know we just did blot art, but it's the perfect homage to the story, so we got started.


Just like our Blot Art Earths, we used paper with a crease already down the middle to assist in folding. Some white paint, spoons and we're off!


Some expert rubbing and then a look at what he's created.


Hmmmmm.......not really sure what this one might be.  We ventured a few guesses, but he decided to try again.


This kiddo ended up with what I think looks like a horse head, but whatever it was, he loved it so much he wanted to keep doing more!


This one looks just like the little cloud in the story, but my son insisted it was the Earth, maybe covered in snow??  He tried a few more times and ended up with a butterfly as well - what a great way to use our imaginations!


**************************************************************
Moving on.  Our next adventure in clouds was Puffy Paint Clouds.  This recipe is so easy and so fun, but I never measure, so you'll just have to wing it.  Mix white glue with shaving cream and food coloring until it looks like this and begin painting!  I always encourage the kiddos to leave lumps on their papers because when it dries, it really looks like clouds!  We use this paint for snowmen in the winter as well.


This is one time we do NOT wipe off the brush on the side of the bowl before we start painting!


All dry and puffy!  The kiddos LOVE to feel it, so don't be surprised if it ends up all smooshy, but that's alright - new sensory experience!

*******************************************************
Our last cloud activity isn't really very weather-y, but it's so fun that I couldn't resist putting it in this week.  Bubble Prints!!  I wasn't able to get any pictures of this activity this year, because my parent helper and I were blowing bubbles until we neared exhaustion.  Fortunately, I have pictures from last year.

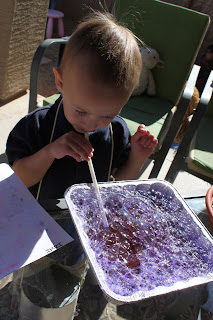
I use 8x8 aluminum pans and large sheets of card stock to prevent the paper from winding up all the way in the water (though accidents still happen).  Just put a small amount of water in the bottom of the pan, add a good amount of dish soap (I told you I don't measure, maybe 1/4 c.?) and your desired color.  The more color you use, the darker your prints will be.  I used about 2-3 T of liquid water color this year and our results were amazing!

If you have older children, they can blow the bubbles themselves, but we had an unfortunately mishap last year with my little one, so I chose to have the adults do the blowing this year.


Blow enough bubbles to come over the top of the pan (ya know, like clouds!) and lay your paper on top.  When the bubbles pop, they will leave a lovely mark on the paper.  Repeat this with as many colors, as many times as you'd like.

Last year's results on canvas, sent to Grandma.

This year's results - with a ton more liquid water color!


Next up: Rain!!


Monday, April 22, 2013

A Week of Weather: Day 1 - Wind


According to the curriculum I purchase from Little Acorn Learning, one week this month is supposed to be dedicated to rain.  I live in the desert.  We don't have rain - unless it's monsoon season - so it's a bit difficult to fill a week with rain activities and keep the children interested.  I decided to expand upon the theme and cover weather in general.

Day 1 of this Week of Weather was all about WIND!  We have quite a bit of that here in the Phoenix, AZ area, and we've had some very windy days in the past few weeks, so I knew it would be in the recent memories of the kiddos.

I set up the light table with a heavy/light experimentation area.

I also provided a straw for each child.  A note about wind experiments: be prepared for spit.  Blowing through a straw without saliva interfering is very difficult for the little ones, so have your anti-bacterial wipes ready.

The children tried to move everything around on the table and we talked about what moved and what didn't - light things and heavy things.  My son decided that he didn't like the fact that he couldn't knock over that little tower of blocks, so he just leaned in and sneakily bumped it with the bottom of his straw!  We were surprised that we could move the small wooden cars with our ''wind", but not the train cars from our set of Prism Blocks.

Feathers were the favorite!  I plan to have this area open for the remainder of the week, and I think I'll provide a few more feathers and perhaps attempt a 'catch wall' around the perimeter of the light table - there was a lot of bending to pick up on my part, BUT, all in the name of science!


Since we were on a roll with those straws, we tried some "Wind Painting".  This is a super-easy project that works best with older kids; however, if you do it with a class of two-year-olds as I did, hilarity will definitely ensue and they will have a blast anyway!


We used finger paint paper (taped down) - to provide a slick surface so the paint wouldn't be immediately absorbed - and liquid watercolors.  If you have older children, you could have them drop the paint on the paper themselves, but since I had all little ones, I wanted them to focus on the "wind" portion, so I dished out the colors as they asked for them - bonus color lesson!  Teal, Fuchsia, Tangerine and Violet!

What an awesome technique!!  The kids loved it and they were so proud once they finally got the hang of it and were able to move that paint across the paper!

Check out that powerful wind action!!


Happy Earth Day!

Next up:  Clouds!

Friday, April 19, 2013

Blot Art Earth

So, as always, I'm a little late to the party and Earth Day is almost here.  I finally got around to doing an Earth Day art project with my kiddos.  I've been doing these types of paintings for years, and I see them in various forms on the web, always with different names and descriptions.  I've always referred to them as Blot Art.
The process is simple, provide your paint along with pre-folded sheets of thick paper.  Have the children apply the paint to the paper....I always use spoons, it tends to discourage the spreading of the paint which would most definitely occur if a paintbrush was the desired mode of transportation from bowl to paper.  It was an unusually chilly morning here in AZ, so my lil guy is a bit bundled for the pictures.
 

"Look, it's blue on top of green!"

 Once your child has finished slathering his paper with paint, just fold along the crease and rub.

 There we go!  "It looks like a mountain!"  Yes, yes, I know, not much like the Earth at all, BUT.....
 

...if you try, try again, you may just end up with "TWO Earths!"

 AND, as an extra bonus, you may also end up with South America!

Just a few tips.  Be sure to have plenty of paper on hand and lots of space for pictures to dry.  South America STILL isn't completely dry after nearly 12 hours!  This is truly a process-based project so don't be surprised when the children have no interest in what their finished product looks like and are simply ready to grab another sheet of paper and begin again.

Happy Earth Day!


Wednesday, April 3, 2013

An Eggs-traordinary Eggs-travaganza


Ok, so I took some liberties with the title, but this week of egg dyeing techniques was seriously the most fun I've had in a long time.  The kiddos were all so excited (yes, I know I could have said 'egg-cited') even though Easter was over.  The holiday activities were fresh in their minds and they were more than happy to continue the festivities at preschool.

Because of the way our preschool schedule works, I have different children every day, but a few who come multiple days, and I knew one egg dyeing technique just wouldn't work, so I thought, why not do a different one each day?  Since I have two classes each day, that's quite a few different ways to color an egg!

**********************************************************
Our first adventure was 'Tie Dye Eggs' courtesy of Mom to 2 Posh Lil Divas.  You can find handy instructions on her blog, so I'll just show off our stellar pictures.

Drippity-drop, drippity-drop, make the colors plippity-plop!
 
Squeezing tubes of food coloring is a bit difficult for little hands!
I got the spray bottles at the Dollar Tree - they are the perfect size and only have a 'mist' function, so it's difficult for the little ones to get too carried away when all they want to do is spray, spray, spray! 
We waited patiently until the end of class for our results, but they were worth the wait!!
Awesome!!!  By far our best results!

***********************************************************
Our next technique was natural food dye.  There are a TON of recipes and suggestions online, but I'll just go ahead and link you up with my favorite local blog, Fit Kid's Clubhouse
Based on numerous suggestions, I decided to try the most mentioned items, cabbage, beets, blueberries, coffee, and turmeric.  I also had some curry powder and thought I'd throw that in for good measure.  The most common item I heard mentioned to get a green egg was liquid chlorophyll, but who the heck has that laying around?  I thought I'd try some chlorella powder - cause, ya know, EVERYONE has THAT laying around! :)
There were many sights and smells with this technique, the worst of which was the lovely algae aroma of the chlorella powder.....needless to say the kiddos left the kitchen and headed outside as we boiled everything and awaited results. 
Prior to placing the eggs in the pots, I wrote on them with a white crayon the name of each natural dye we were trying - as you can see, only the coffee egg really held the crayon.  There is faint lettering on the turmeric egg as well, but I'll just have to rely on my memory.  From the top left: chlorella - pretty much no color; coffee - light brown; beets - pinkish/grey; blueberries - blue-grey; turmeric - yellow; curry powder - light yellow; cabbage - light blue; and the last one was a mix of the red cabbage and the turmeric that I threw together at the last minute after seeing it on the Fit Kid's Clubhouse blog - ya know, just in case the chlorella didn't take.

Overall, this was a good experiment for the kids, we got to use our senses and we learned never to boil chlorella powder again!

*****************************************************
My favorite this week had to be our Shaving Cream Eggs (real and paper).  Done beautifully here.  I've done shaving cream art in the past and it's always a favorite, but after reading about mixed results on the eggs, I was determined to get a beautiful finished product.
I made sure to use just enough shaving cream to cover the bottom of the tray and encouraged the kiddos to use as much color as they wanted, then some swirling and roll the eggs in the cream.  I let them sit for a few minutes before wiping the shaving cream off with a paper towel.
I'm very happy with the way they turned out and the kiddos got to take home the paper versions.

*****************************************************
 Next up: A technique using hot glue as a stencil that I found at Measured by the Heart.  I know most preschool teachers wouldn't allow the use of hot glue guns by the students, but this particular class is made up of all older children and I knew they would use caution.  I loved this technique in theory, but I had some difficulty with it.  I'm not sure if it was the hot glue itself, or the fact that I decided to take a short cut and use the 'hard cooked eggs in the oven' method for this particular dozen eggs, but something went wrong.  As we peeled the glue from the eggs, the shell came with it; thus, not revealing the lovely stenciling featured on the blog.
However, I'm pretty sure that because I took this very cleverly composed shot of our materials, all is forgiven. :)
 We used whisks to make dipping easier after we applied the hot glue and the kiddos had a blast just dipping and dipping and dipping, until we ended up with quite a few brown eggs....they didn't care about the glue portion at all, really.
 Well, putting the glue on was fun, but beyond that, it was all about the dipping!
 I still think the results were lovely!

****************************************************
Last, but definitely not least, our most EGG-splosive (yes, I went there) technique - Volcano Egg Dyeing!!!  We did this one last year and it was a huge hit, so I decided to use it for the final two classes.  
I made a very thick paste with baking soda, food coloring and water for the children to paint on their eggs.  Once they were finished painting, I gave them the 'secret ingredient' - vinegar!!
Once they discovered what happened when the vinegar was poured on the egg, they couldn't get enough!  They painted and poured and there was no stopping them - it was a great way to finish off our egg dyeing adventures!


I know this was a long one, thanks for sticking with it!!  Now, off to plan for next Easter!


Related Posts Plugin for WordPress, Blogger...