Showing posts with label cooking. Show all posts

Saturday, June 6, 2015

Summer Fun and LOTS of Learning!

We had a very busy first week of Summer Camp here at Seedlings.  I was so busy, in fact, that I neglected to capture all of the awesomeness with the camera.  I did get a few great shots, though, and I'm excited to share them with you!!

Everyone loves play dough, so we started our week with some glittery 'sand' play dough and a few beachy toys.
 We read a Let's Find Out classroom magazine from Scholastic and created our very own sun-shaped suncatcher.

My adorable toddler class created watermelon art that you can see in this post from last summer.

Meanwhile, my Pre-K kiddos cut and painted another sun using a plastic wrap painting technique I found here.  We skipped the extra sheet of paper and opted for some extra cutting practice instead.

Quite possibly my favorite project this week was our ice cream cones.  Usually, I do this project using shaving cream paint as I did last summer, but this year, I purchased foam paint and decided to give it a whirl.  The children LOVED it and it looked almost good enough to eat!!

And speaking of good things to eat, my Pre-K class is 100% responsible for their own snack preparation.  Monday is bread day, so I created a pictorial recipe for the children to follow.  You can create your own with pictures of the brands you use, but if you are lacking a bread recipe, this one is pretty close to the one we use these days.
Wednesday is veggie soup day, so the first activity of the day is chip-chopping lots of delicious veggies - some fresh from our garden!
And after a couple of hours of hard work and play, we are rewarded with this:
So delicious!!

Friday is usually Fruit Salad day, but this week, our Let's Find Out and an older Scholastic My Big World magazine all contained ice cream activities, so I sprung for a real ice cream maker and we were saved from shaking our usual Ice Cream in a Bag and got to enjoy a tasty cool treat to finish out our week of summer fun!

Due to an unfortunate incident in our garden, we ended up with one of our sunflowers inside in a vase and we tried still life with oil pastels.  The children were captivated by the new art material and I can't wait to continue using the oil pastels with a variety of different techniques.

I'm looking forward to another 7 weeks of fun and learning with my little Seedlings!!


Saturday, December 14, 2013

Holiday Fun!

Here is a quick look at what we've been busying ourselves with so far this month.  The children have been working like busy little bees preparing gifts for their Moms and Dads, but those are top secret, so take a look at some other fun we've had!

Cookie Cutter Prints

Gingerbread Play Dough

Our Gingerbread Man Decorating Tray has been popular...

So we decorated some to take home!

So cute!

Our water activity has also been a hit!

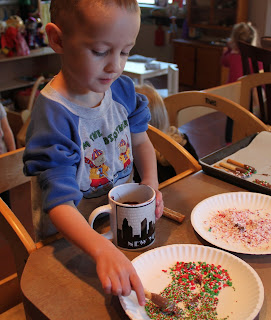
One of our cooking activities this month was Chocolate-Covered Pretzels.  The children loved stirring up the chocolate with the pretzels and then dipping them in sprinkles!


One project that I do EVERY year is Shaving Cream Paint Snowmen - they always turn out too adorable for words!  Just mix some shaving cream and a little white glue and pile it onto your paper.  Add accessories and let dry.  The paint will stay puffy after it's dried!!


Check out this masterpiece!


I've just given our classroom a mid-month make-over, so stay tuned for new classroom pictures!


Tuesday, May 28, 2013

Super-Easy DIY Felt Food

Last week, I attended a training all about cooking in the classroom.  You can see our most recent cooking adventure here.

After we were finished in the big kitchen, the children moved immediately to the play kitchen to continue their work creating wonderful goodies to eat.

I've been meaning to add some simple felt food to our kitchen, which was inspired by an exhibit at our local children's museum.  At the museum, they have a pizza parlor area complete with brick ovens, pizza peels, aprons and fabric crusts ready to be filled with toppings made of a wide variety of textured materials.  It's actually called 'Texture Cafe' and it's always jam-packed with little chefs.

Eventually, I'll add some different textures to our kitchen as well, for now, I had a bunch of felt laying around and decided to just start cutting.  At the training, we were given a bag full of kitchen tools, one of which was a pizza pan, so I figured I'd start there.

If you do this at home, you'll want to be sure to use high-quality sewing/fabric scissors so the felt will cut well.  Thinner felt may cut with regular scissors, but thick or 100% wool felt will not.

I used red felt for sauce and then darker red for pepperoni, small yellow pieces for cheese and green for some sort of veggie - green peppers, maybe?  My husband has challenged me to make a crust like the ones at the museum, so that might be in my future, but in the meantime, the kiddos have been using the wooden bread slices that came with our Melissa and Doug toaster.


Since I was feeling in the mood for Italian, I tackled some spaghetti and meatballs next.  Just some longer strips of yellow, some brown circles for meatballs and the remnants of red left from cutting the pizza sauce and voila!  An Italian favorite!


Of course, we can't forget fruits and veggies.  I just cut the shapes freehand to sort of resemble common fruits and veggies, but I also included a variety of ovals, circles and rectangles to allow the children to bring the foods to life.


Finally, I decided that the food needed some dimension, so I decided to make some felted woolen fruits/veggies.  I made a small ball of each color.  It's up to the kiddos to figure out what they are exactly.

Making felted fruit - or felted balls of any kind is ridiculously simple.  All you need is some wool roving, a pair of old stockings and a washing machine and dryer.

- Roll the wool roving into a tight ball and stuff into the toe of the stockings. 

- Tie a knot in the stockings so they are stretched tightly around the ball and it will not be able to move.

- Repeat with other colors being sure to tie a knot between each ball or they'll felt together.

- Wash on hot with a teeny bit of detergent and then dry thoroughly in the dryer.  I never have an exact formula for this, I take them out of the stocking and check them and if they look as though they'll hold together, I'm done, if not, I tie them all back up and wash/dry again.


I'm currently working on a half-dozen felted eggs - more on that to come!


Friday, May 24, 2013

Preschool Cooking: Zucchini Bread

I attended another wonderful training session this week all about cooking with children.  I've been cooking in my classrooms for the entirety of my career as an early childhood teacher, but of course, after meeting with my amazing group of fellow providers and hearing from a master teacher who cooks with her preschoolers weekly, I was feeling inspired.

One of my stellar preschool parents passed along quite a few zucchini from her garden and I looked high and low for a new zucchini bread recipe to replace the one I've been using for years, which always comes out a tad dry in my current oven (which runs hot and cooks unevenly) and doesn't seem to hold up well after a few days in the dry Arizona heat.

I finally settled on this recipe that I found at Allrecipes.com.


Ingredients:

3 cups all-purpose flour
1 teaspoon salt
1 teaspoon baking soda
1 teaspoon baking powder
3 teaspoons ground cinnamon
3 eggs          
1 cup vegetable oil
2 1/4 cups white sugar
3 teaspoons vanilla extract
2 cups grated zucchini
1 cup chopped walnuts

Directions:

1. Grease and flour two 8 x 4 inch pans. Preheat oven to 325 degrees F (165 degrees C).
2. Sift flour, salt, baking powder, soda, and cinnamon together in a bowl.
3. Beat eggs, oil, vanilla, and sugar together in a large bowl. Add sifted ingredients to the creamed mixture, and beat well. Stir in zucchini and nuts until well combined. Pour batter into prepared pans.
4. Bake for 40 to 60 minutes, or until tester inserted in the center comes out clean. Cool in pan on rack for 20 minutes. Remove bread from pan, and completely cool.


Just a few notes about this recipe:

- I would never advocate this much sugar in ANYTHING and I normally would replace the white sugar with honey or maple syrup, but since I'm screen-free during my school day, I had no way of checking the honey to sugar replacement ratio.  It's about 3/4c. honey for every 1c. sugar, and you also have to reduce the liquid ingredients in the recipe by a few tablespoons, in case you were wondering.  Anyway, I cut the sugar down to about 1 1/2c. and it was still more like zucchini cake than bread - so less would have been fine.

- Vegetable oil never goes in anything I bake, I replace with applesauce, banana, melted coconut oil, or a combination of those things, BUT, since it was grocery day, I had none of the above and had to use vegetable oil.

- I never put nuts in breads like this - I usually have at least one nut-free kiddo, so why risk it?

- I used white whole wheat flour from Trader Joe's in place of AP


Ok, now that we've gotten logistics out of the way, let's move on to the kids having a ball doing all the parts of this recipe themselves!!

We gathered our ingredients and started grating zucchini!  I don't have a very child-friendly grater, but I plan to purchase something like this that might work better.

I am fortunate to have two learning towers at my kitchen island, so I can have the kids up with me safely and I can easily reach everything to help.  I've tried cooking in the classroom, but being in the kitchen keeps it relevant for the kids and lends itself to fast cleanup.


Leveling the baking soda.  I've never had the kiddos do this part, so it was a new experience for everyone.  Next time, I'll give him a butter knife so we don't have too many fingers exploring the ingredients.


More leveling - look at that concentration!

Pouring the oil.  We talked about the measuring cup and what all the lines mean and we read the recipe to discover that we needed one cup of oil - which we'll definitely be adjusting next time we make this recipe. 

"I can fill it up to the 1, I will pour it carefully, don't help me!" 

And guess what? He did pour carefully and he did stop exactly at the 1 cup line.


"What does it smell like?"

"Hmmmm.....I wonder....."

"Cinnamon!  I LOOOOOVVVEEEE cinnamon!"


Time to whip out (no pun intended) the old-fashioned egg beater!!  I seriously love this thing.  Not only does it provide an opportunity for real work for the kids, but it makes a strong connection between that work and the changes being made in the bowl. 

"Look, I'm mixing it up!"  "I'm catching the egg yolks!"


I didn't get pictures of the kiddos mixing the wet and dry ingredients, because I was 'bowl-holder' while they stirred with both hands - it was a bit stiff, but loosened up perfectly when we added the zucchini.

And of course, after the bread went into the oven, the children retired to the play kitchen to cook some more!


Cinnamon on your pizza?? Sure!


I heard a lot of cooking terms being thrown around during the play session: sift, measure, fill, sprinkle, pour, etc.

They were so involved, they didn't even notice the 45 minutes it took for our bread to be ready.

And the best part?  We got to eat it!


Monday, April 8, 2013

Miss Lindsey Had a Farm


And on that farm......well, backyard really, were three little chickens named Blanche, Dorothy and Sophia....do you know where those names came from??  Do tell!!
That's right, we are now the proud owners of two Buff Orpingtons and a Rhode Island Red - that's Blanche, of course!  We decided to begin keeping backyard chickens, mostly for the free eggs and fertilizer, but also because we're a bit too busy (or maybe a tad lazy) to worry about composting and we needed a place for our food scraps.  Thus far, the ladies are quite happy to gobble down whatever it is we give them.  They especially like cabbage, celery and other green stuff, though we give them fruit scraps as well.
I took the pictures on the first day they joined us, so they were getting cozy and relaxing in the coop, I'm sure I'll get some shots of them roaming about the yard at some point.  Speaking of the coop, we purchased ours from Marco with San Tan Valley Coops and More.  We got the most basic coop out there, but this guy builds some serious stuff, so if you are in the market and in the Phoenix area, check him out.
And since we were in a farm-y mood when the chickens arrived, we decided to make some fresh bread and butter for snack the next morning in our preschool class.  Just in case you are feeling farm-y, here are some recipes for you:

Bread

2 1/4 - 2 1/2 c. flour - I do a mix of bread flour and whole wheat
1 c. warm water
1 1/2 t. yeast
2 T softened butter
Handful of rolled oats
2 T honey - or more if you like
1 1/2 t. salt

Ok, so I cheat and put this in my bread machine, according to the directions for dough, pull it out and let the kiddos make it into rolls or any shape they like.  We cover and let it rest for 15min. and then bake at 375 for 12-15 min. or until golden.  BUT, if you want to do it the old fashioned way, you would:

Mix water and honey, top with yeast, let foam
Add oats, butter, flour and salt, mix
Turn out and knead for 10min.
Leave to rise covered in oiled bowl for 1 1/2 - 2 hrs.
Form into rolls/shapes
Cover and let rest 15 min.
Bake 375 for 12-15min.

And you can't have bread without:
Butter!

Whipping cream
Salt


Baby food jars are perfect for little hands, but I'm sure any jar would work.  Place a few tablespoons of cream into the jar (or no more than 1/2 full if using a larger jar) and add a pinch of salt.  Shake, shake, shake!  Oh, and when you are shaking, you should probably look like this.

If you don't, I'm not sure it'll turn out right.  Kidding, of course!  But, seriously, how funny is he??

Anyway, once your butter has formed, you'll have some buttermilk left in the jar, so swish some cold water around in the jar until that excess washes away and the water runs clear.  I've made butter like this many times in the past, but I've never rinsed with water before, I learned about that part from the curriculum guide I purchased from Little Acorn Learning and let me tell you, it made a world of difference - I'll continue making butter this way every time!

Well, if you've been following along, you should have some warm bread and some delicious, creamy butter ready to devour right about now, so go ahead and enjoy!


Related Posts Plugin for WordPress, Blogger...